

Forget IKEA -- Build your own Folding Desk!
Don't get us wrong -- we visited IKEA a lot over the course of the remodel and use a lot of IKEA buys in the trailer. However, there are some times when you just have to say "screw it, I'ma build this sucker myself." Building our own space saving folding desk was probably not one we should have done given that we definitely spent double the price to do it. BUT ours is a helluva lot cooler / more unique / custom built to our needs. So in the end, we say this: follow this DIY if you want to say "f**k you IKEA! you don't own me!" But know that you're gonna pay a little bit for that freedom, okay?
Here's how we did it:
Here's what you're working toward. It looks a lot like the IKEA version, if you ask us. Take note: see that pencil line? We drew that once we found the stud in the wall and it was our measure of how high we wanted the desk to be. Just read below, it'll make sense!
1. Take numerous photos / videos of the original in stores.
Hey, we had to start somewhere. Plus we needed to be able to communicate how this was going to work to Jerry, who has not visited an IKEA store for like three decades. Also, this thing is kind of confusing. It uses TWO hinges -- and up and down sucker and left to right kind of deal.
2. Sketch it out. Discuss it.
You're going to need a visual guide to help you piece this together.
3. Buy up all the wood.
We bought the big top piece at Lowe's -- it was like a big ol' pine board in the craft wood section. Thanks to Jerry's work shop of wonders, we had the rest of the scrap wood we needed to make the braces on hand.
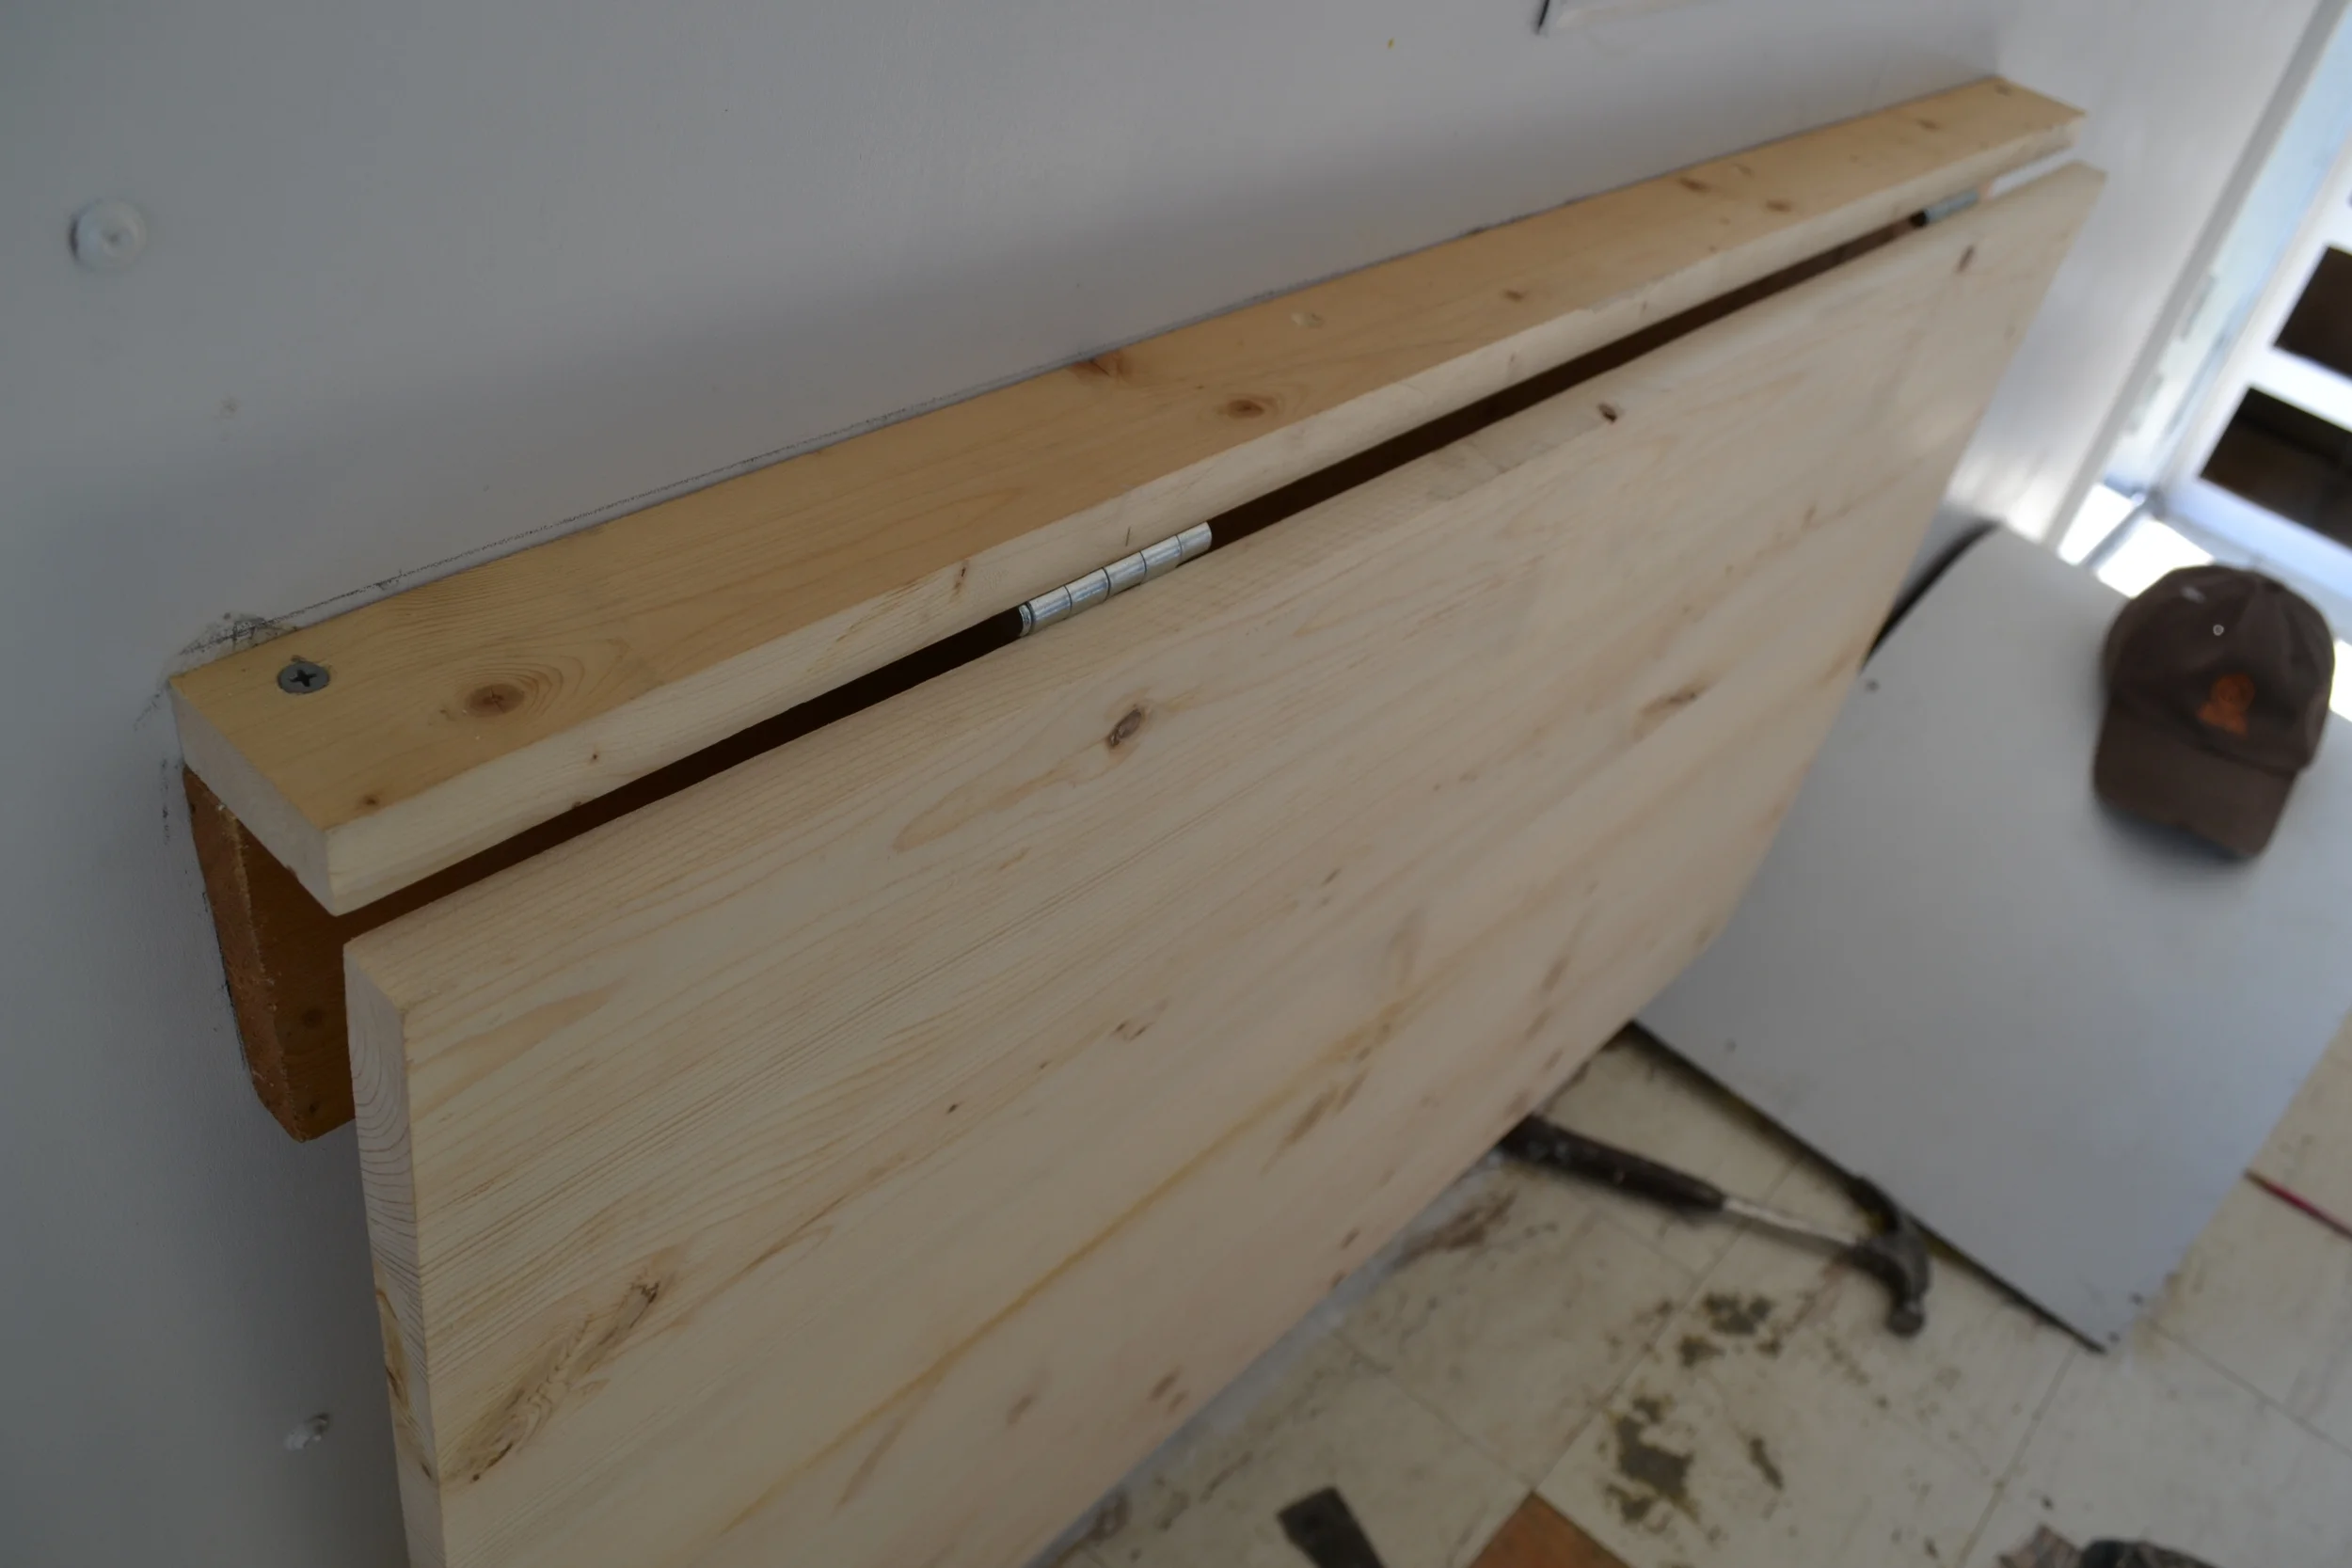
4. Find your stud.
This was kind of the hardest part. Our trailer is old and not really built like the stuff of today. We had to do the hammer a nail into the wall test several times before we for sure found one. (See above photo!)
5. Decide on height.
This is important: you need to figure out what height you want this thing at. Something that is comfortable for working, not too high or short. We were also going to build a companion piece to this (coming in another blog post), so it was extra important we get the height right. Turns out most people find betwee 32" and 34" to be the most comfortable when sitting and working. (Again, see above photo!)
6. Put up your horizontal brace.

Here's the important stuff: a) the horizontal brace is the one drilled into the wall. The lip is the board sitting on top of it. The top is the big piece hinged to the lip. Got it?
Your horizontal support bar is the most important. It bears pretty much all the weight of the desk + you when you lean on it and stuff. They attached this piece first.
7. Add the lip.
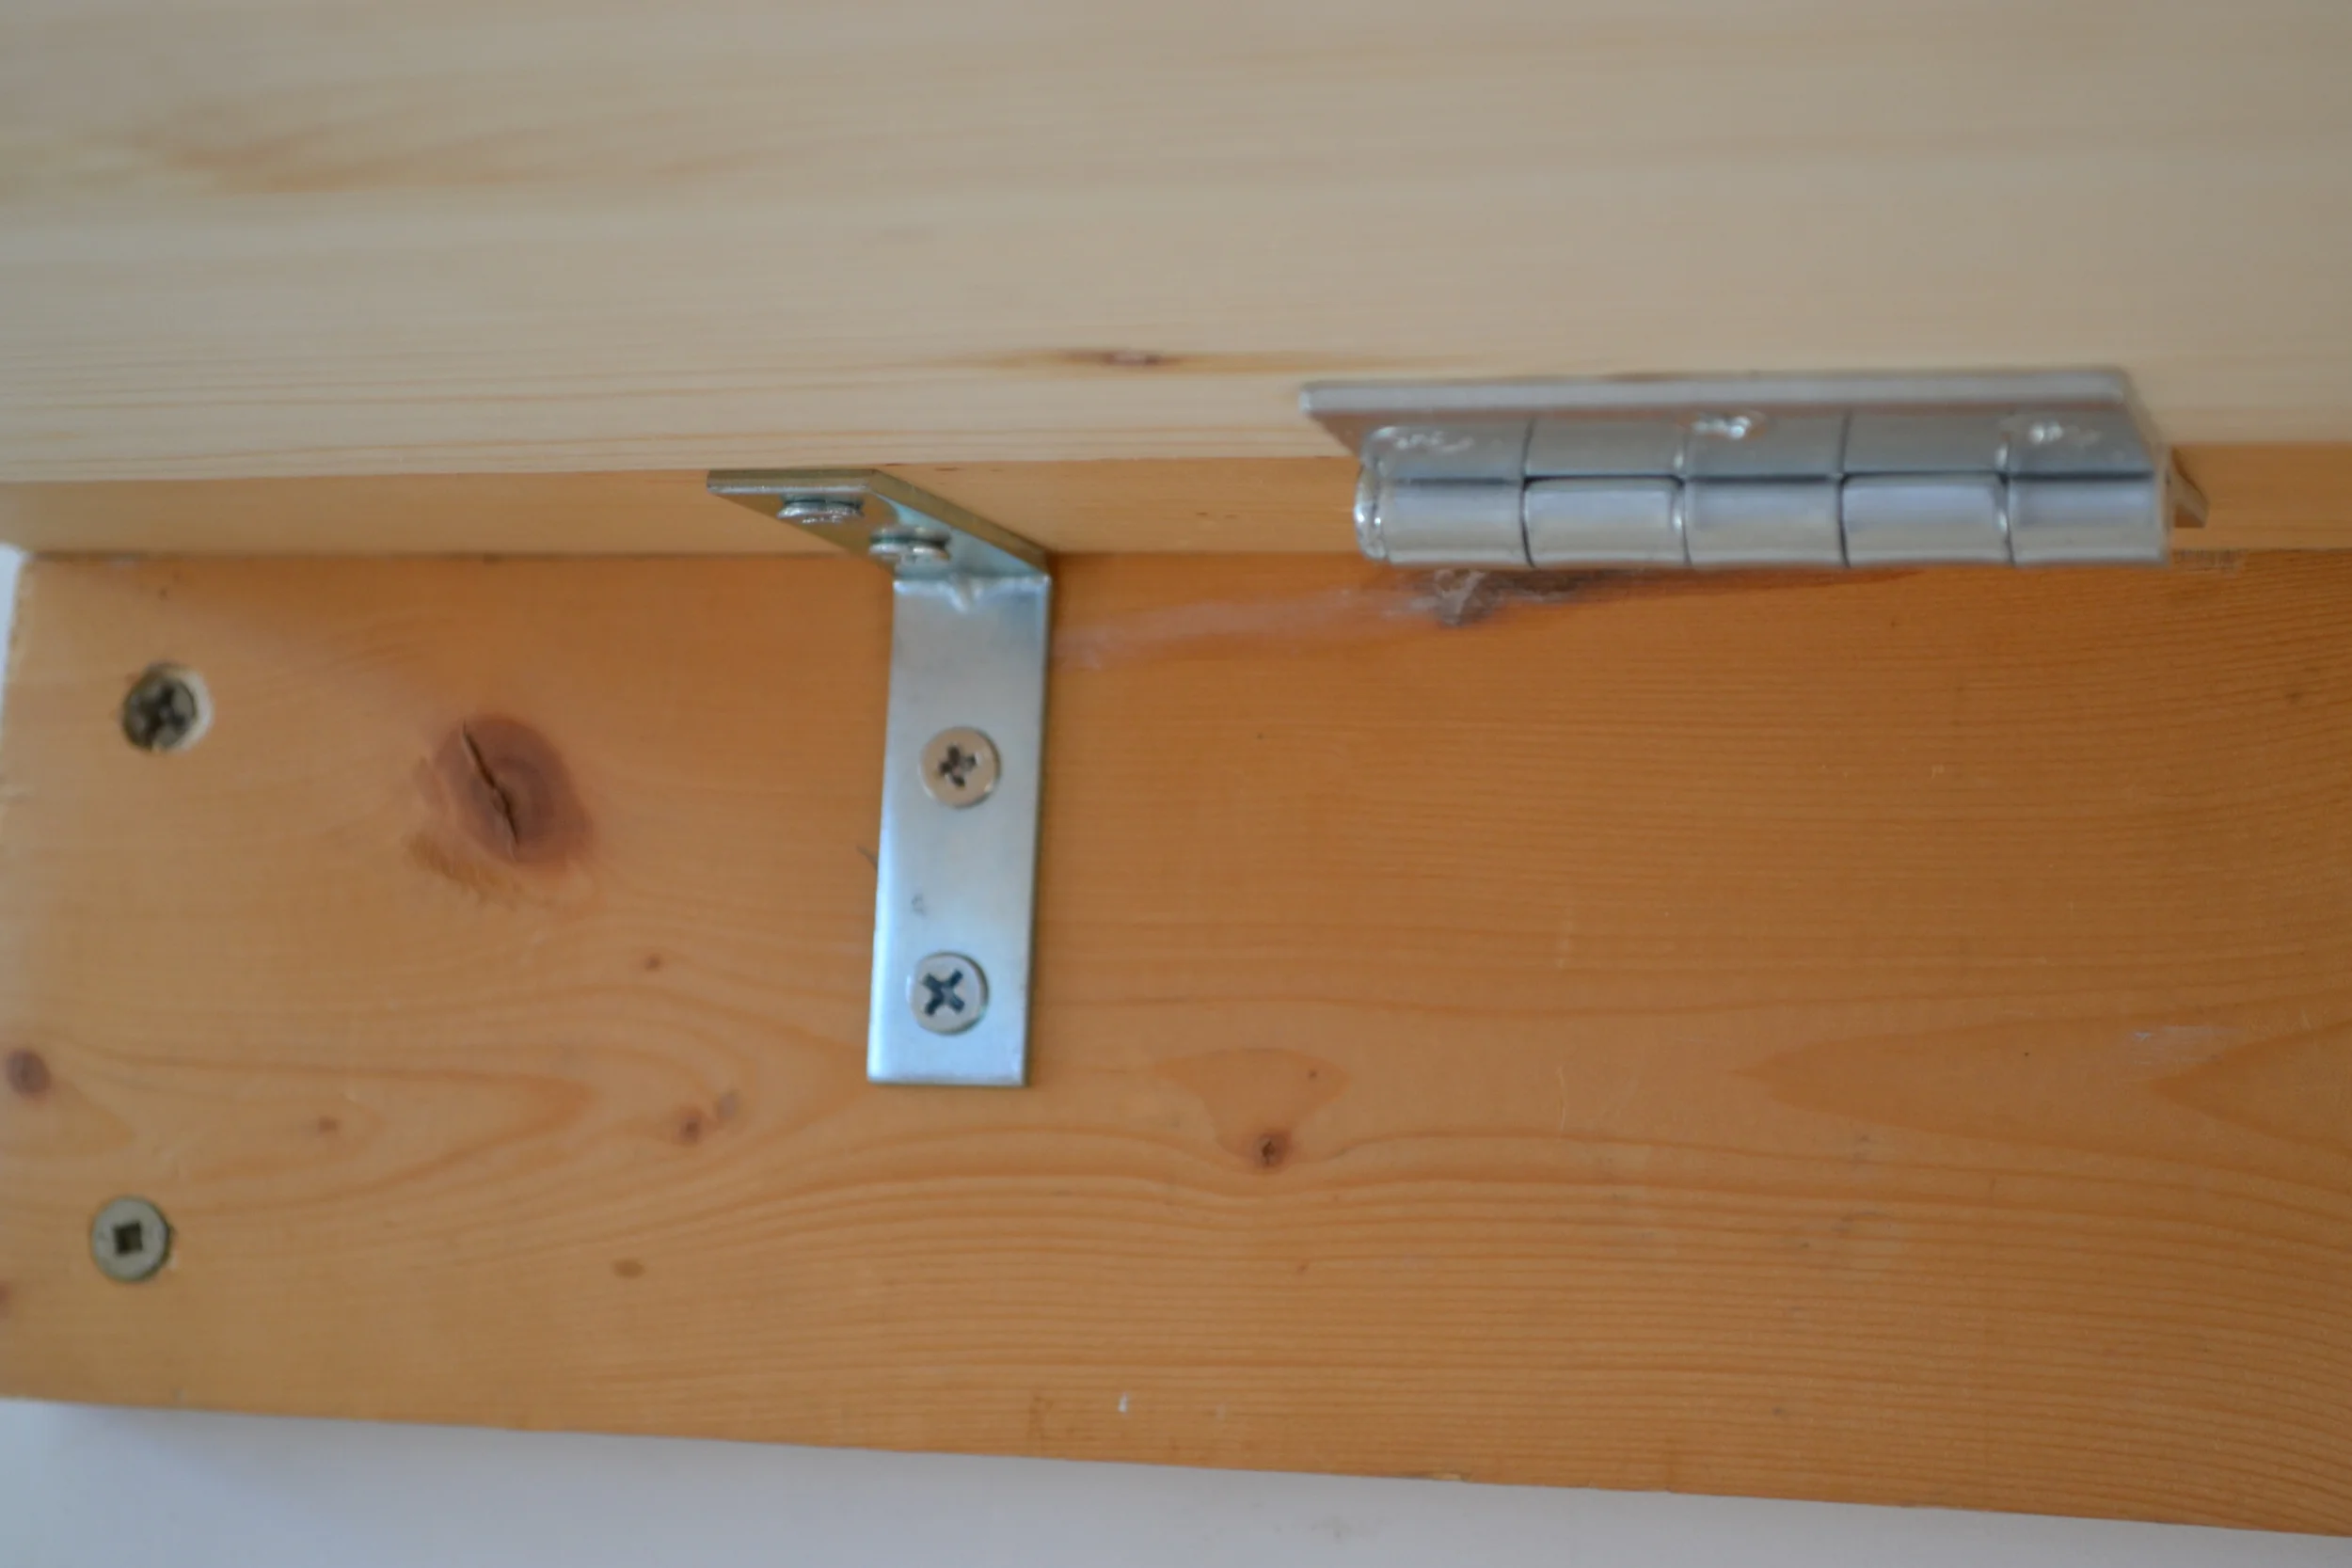
Here you can clearly see the horizontal brace, the lip, the L bracket, and the up/down hinge.
The top lip is essential because without that, the brace you're going to add later would make the desk top stick out when not in use. You have to give the brace space to fold against the wall. Yea, it will make sense later. Anywho, they screwed this lip on top of the horizontal brace and then double supported it with an L bracket.
8. Add the top + hinges.
You're now ready to hinge the top of this desk on. Apply your hinges on the underside of the lip and underside of your top. (See photo from step 7!)
9. Make a T.

Here's your T. Also: see the brace board we applied the the underside of the top board.
You've got your horizontal brace, lip and top attached. Now you need to nail a vertical brace to the wall -- this is what your folding brace is going to secure to. You can't just add it to the wall (sorry). So go ahead, make this T.
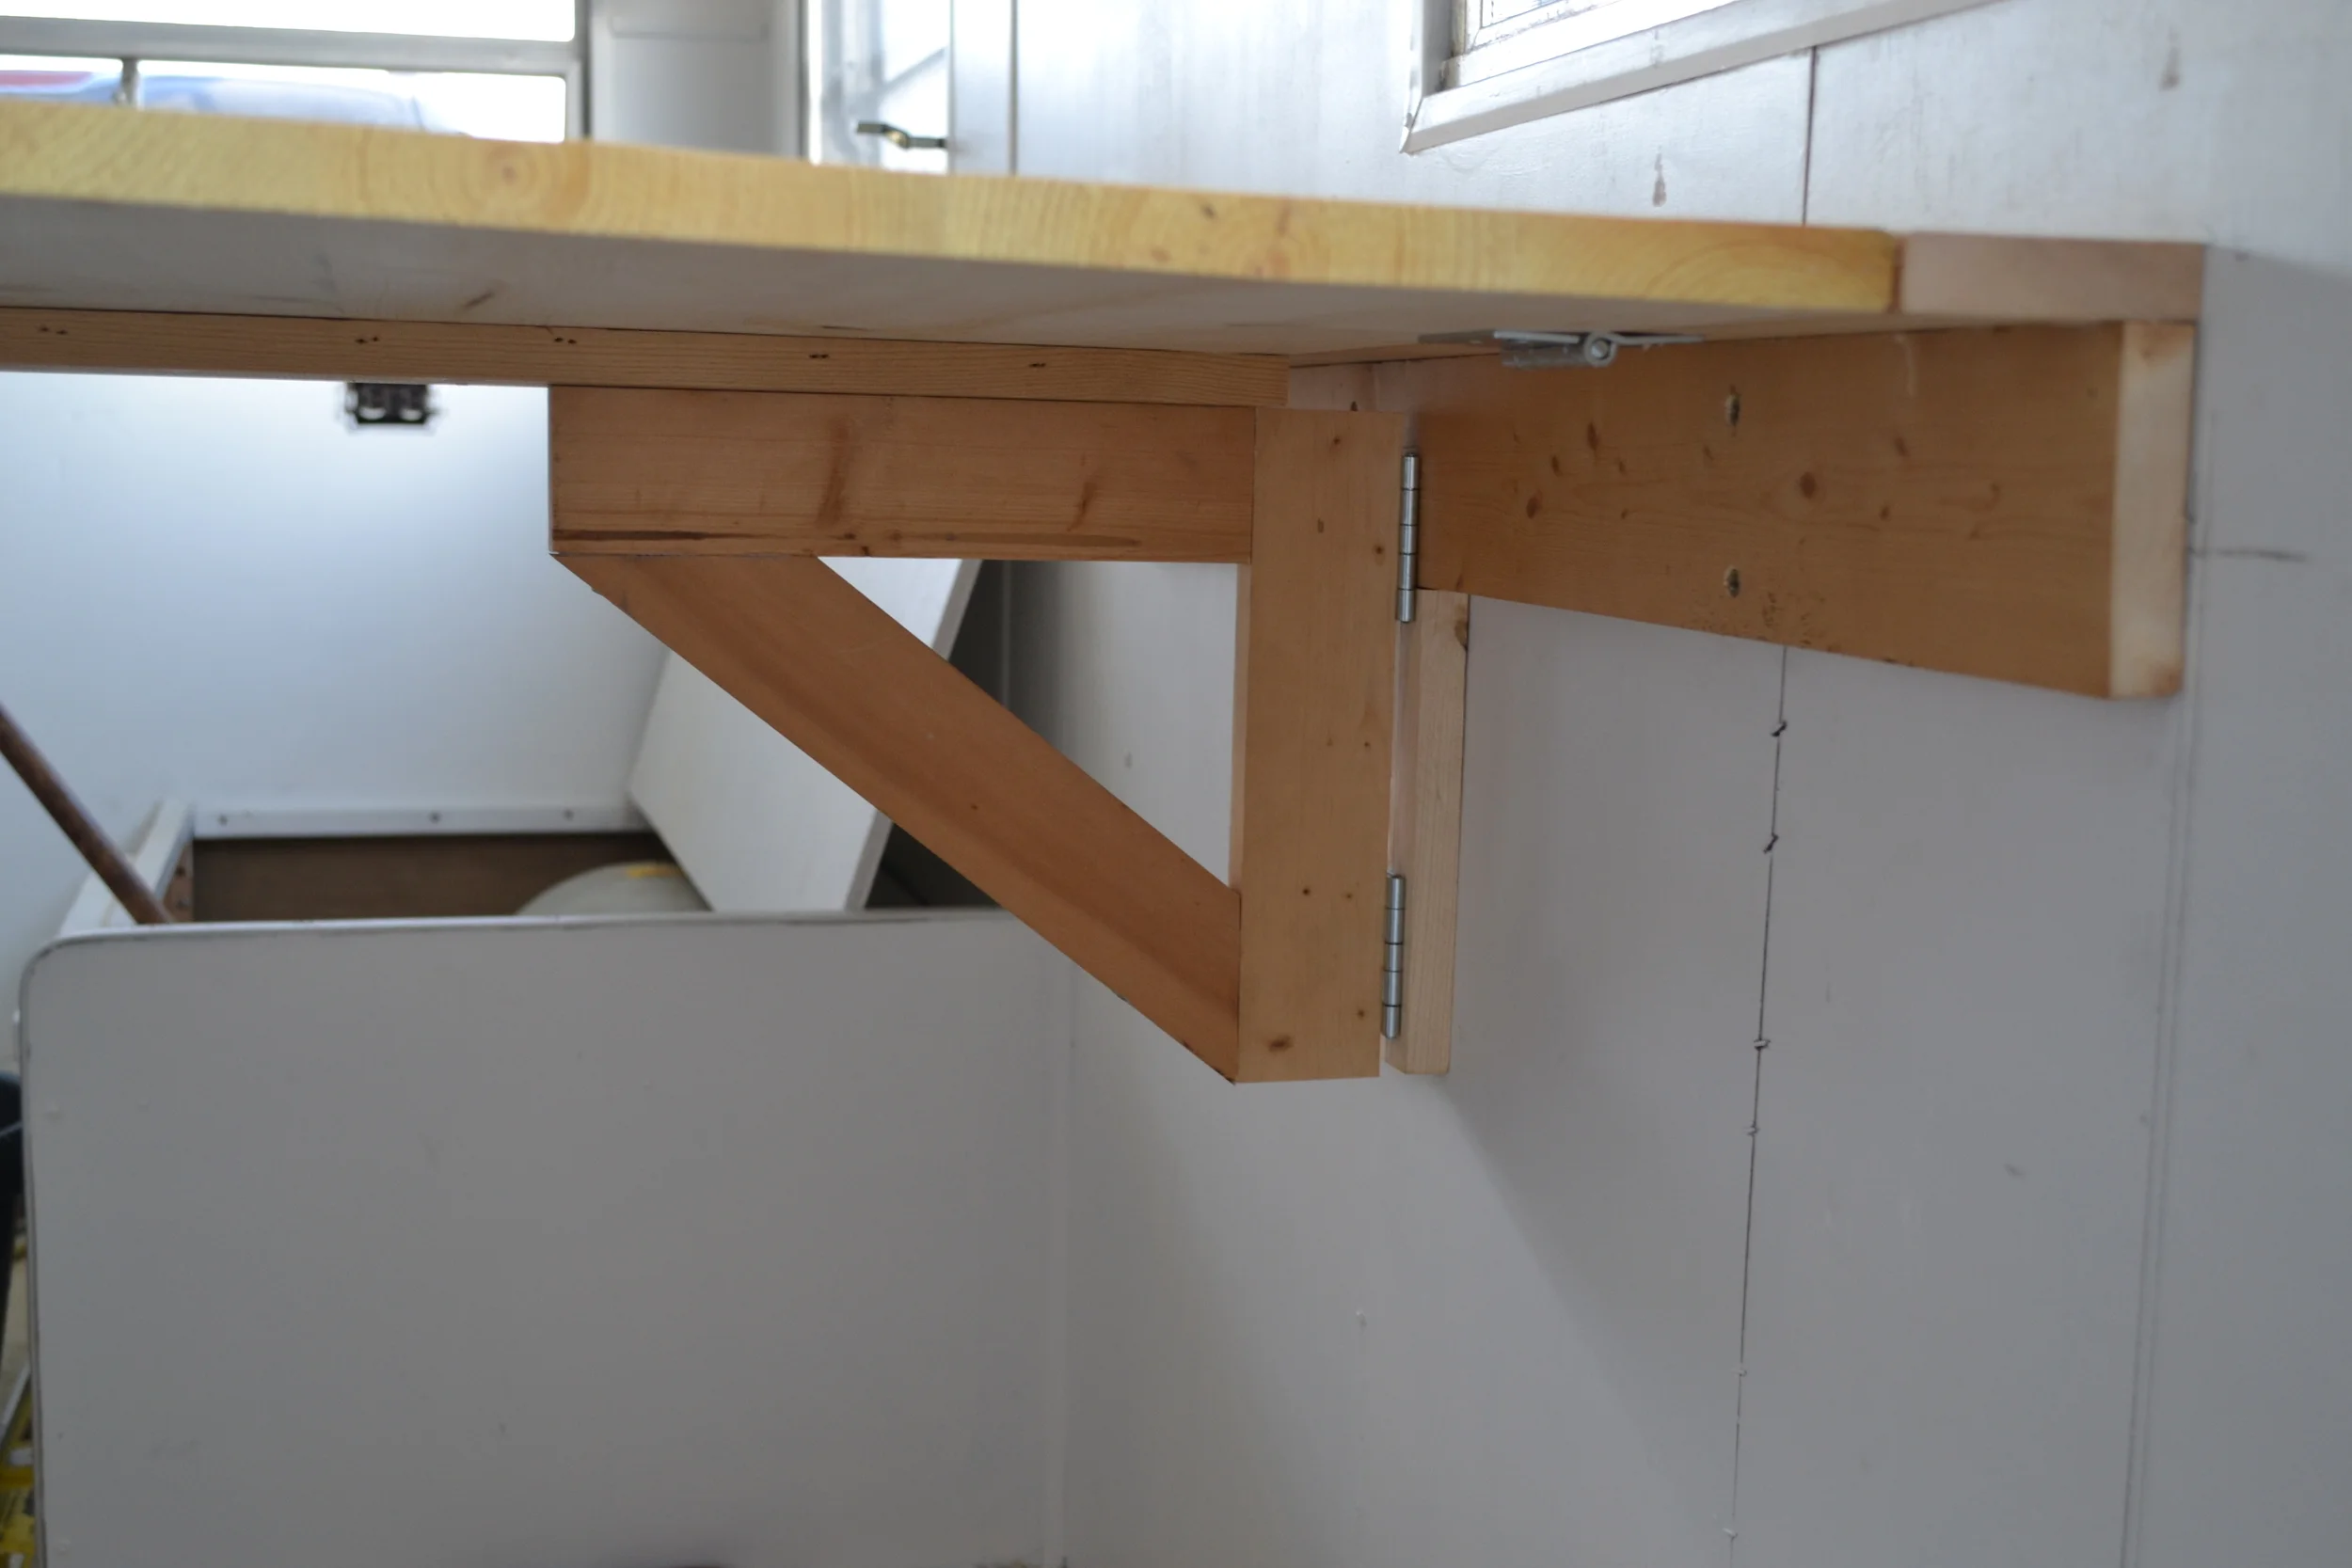
10. ADD A BRACE UNDERNEATH THE TOP board.
You need this for step 13. (See the above or below photo for a visual guide).
11. Build your triangle brace.

Jerry screws the triangle brace into the T.
We tried our best to copy the IKEA plan for this and make a good looking triangle brace. We ended up building it out of three different pieces of wood. Point of discussion: Carson wanted to cut the brace out of one single piece. Jerry kaiboshed that. Said they needed to build it out of three separate wood pieces, and Jerry won out. They used wood glue and screws to assemble it. It’s a triangle (right angle) that connects to the body of the T (that vertical board!) and the underside of the top.
12. Hinge your triangle brace.

Triangle brace is in. Everything's sitting pretty -- now we just have to secure it with the wood peg.

Remember how we said the lip was necessary so that the top board doesn't "stick out" when the triangle brace is folded back? This is your visual guide. See what we mean?
The brace is hinged left to right to the vertical support bar (one hinge there) then another hinge on the horizontal support bar (second hinge).
13. Wood peg.
You're almost there! Now you have to have a way for your triangle brace to securely connect to the top so it doesn't slide around while you work. You need the wood peg for this. Drill a hole in the top of your triangle brace the size of the wood peg. Put half the wood peg into that hole with a little wood glue. This leaves the other half of the wood peg sticking out. Then drill another hole the same size as the wood peg on the brace underneath the topper (what you just did in step 11). Voila, you now have a wood peg system that holds everything in place.

The very, very important wood peg!
14. Sand and stain and polyurethane (rhyme time).
Sand down all the wood pieces, stain them (or paint them if that's your fancy), and seal it all with a good coat of polyurethane.
This inevitably took us one full day to design and build. Then another ½ day to stain and polyurethane it. We also did one last finishing touch: rounding the edges. We just thought that us being us, we'd probably run into the corners a lot. Carson traced the curve of a metal coffee can (smart thinking!) and cut it with a jigsaw.
Voila! Your desk is complete.
We think it was worth it (for us). We love the way it turned out, especially the "dual stain" design Mel gave it to tie into our backsplash. We sit at this thing with an old wooden folding chair that was donated (okay, we took it) by Carson's uncle, Bob.

We rounded the corners because we're clumsy. Carson traced an old tin coffee can to get the shape. Then cut it with a jig saw.
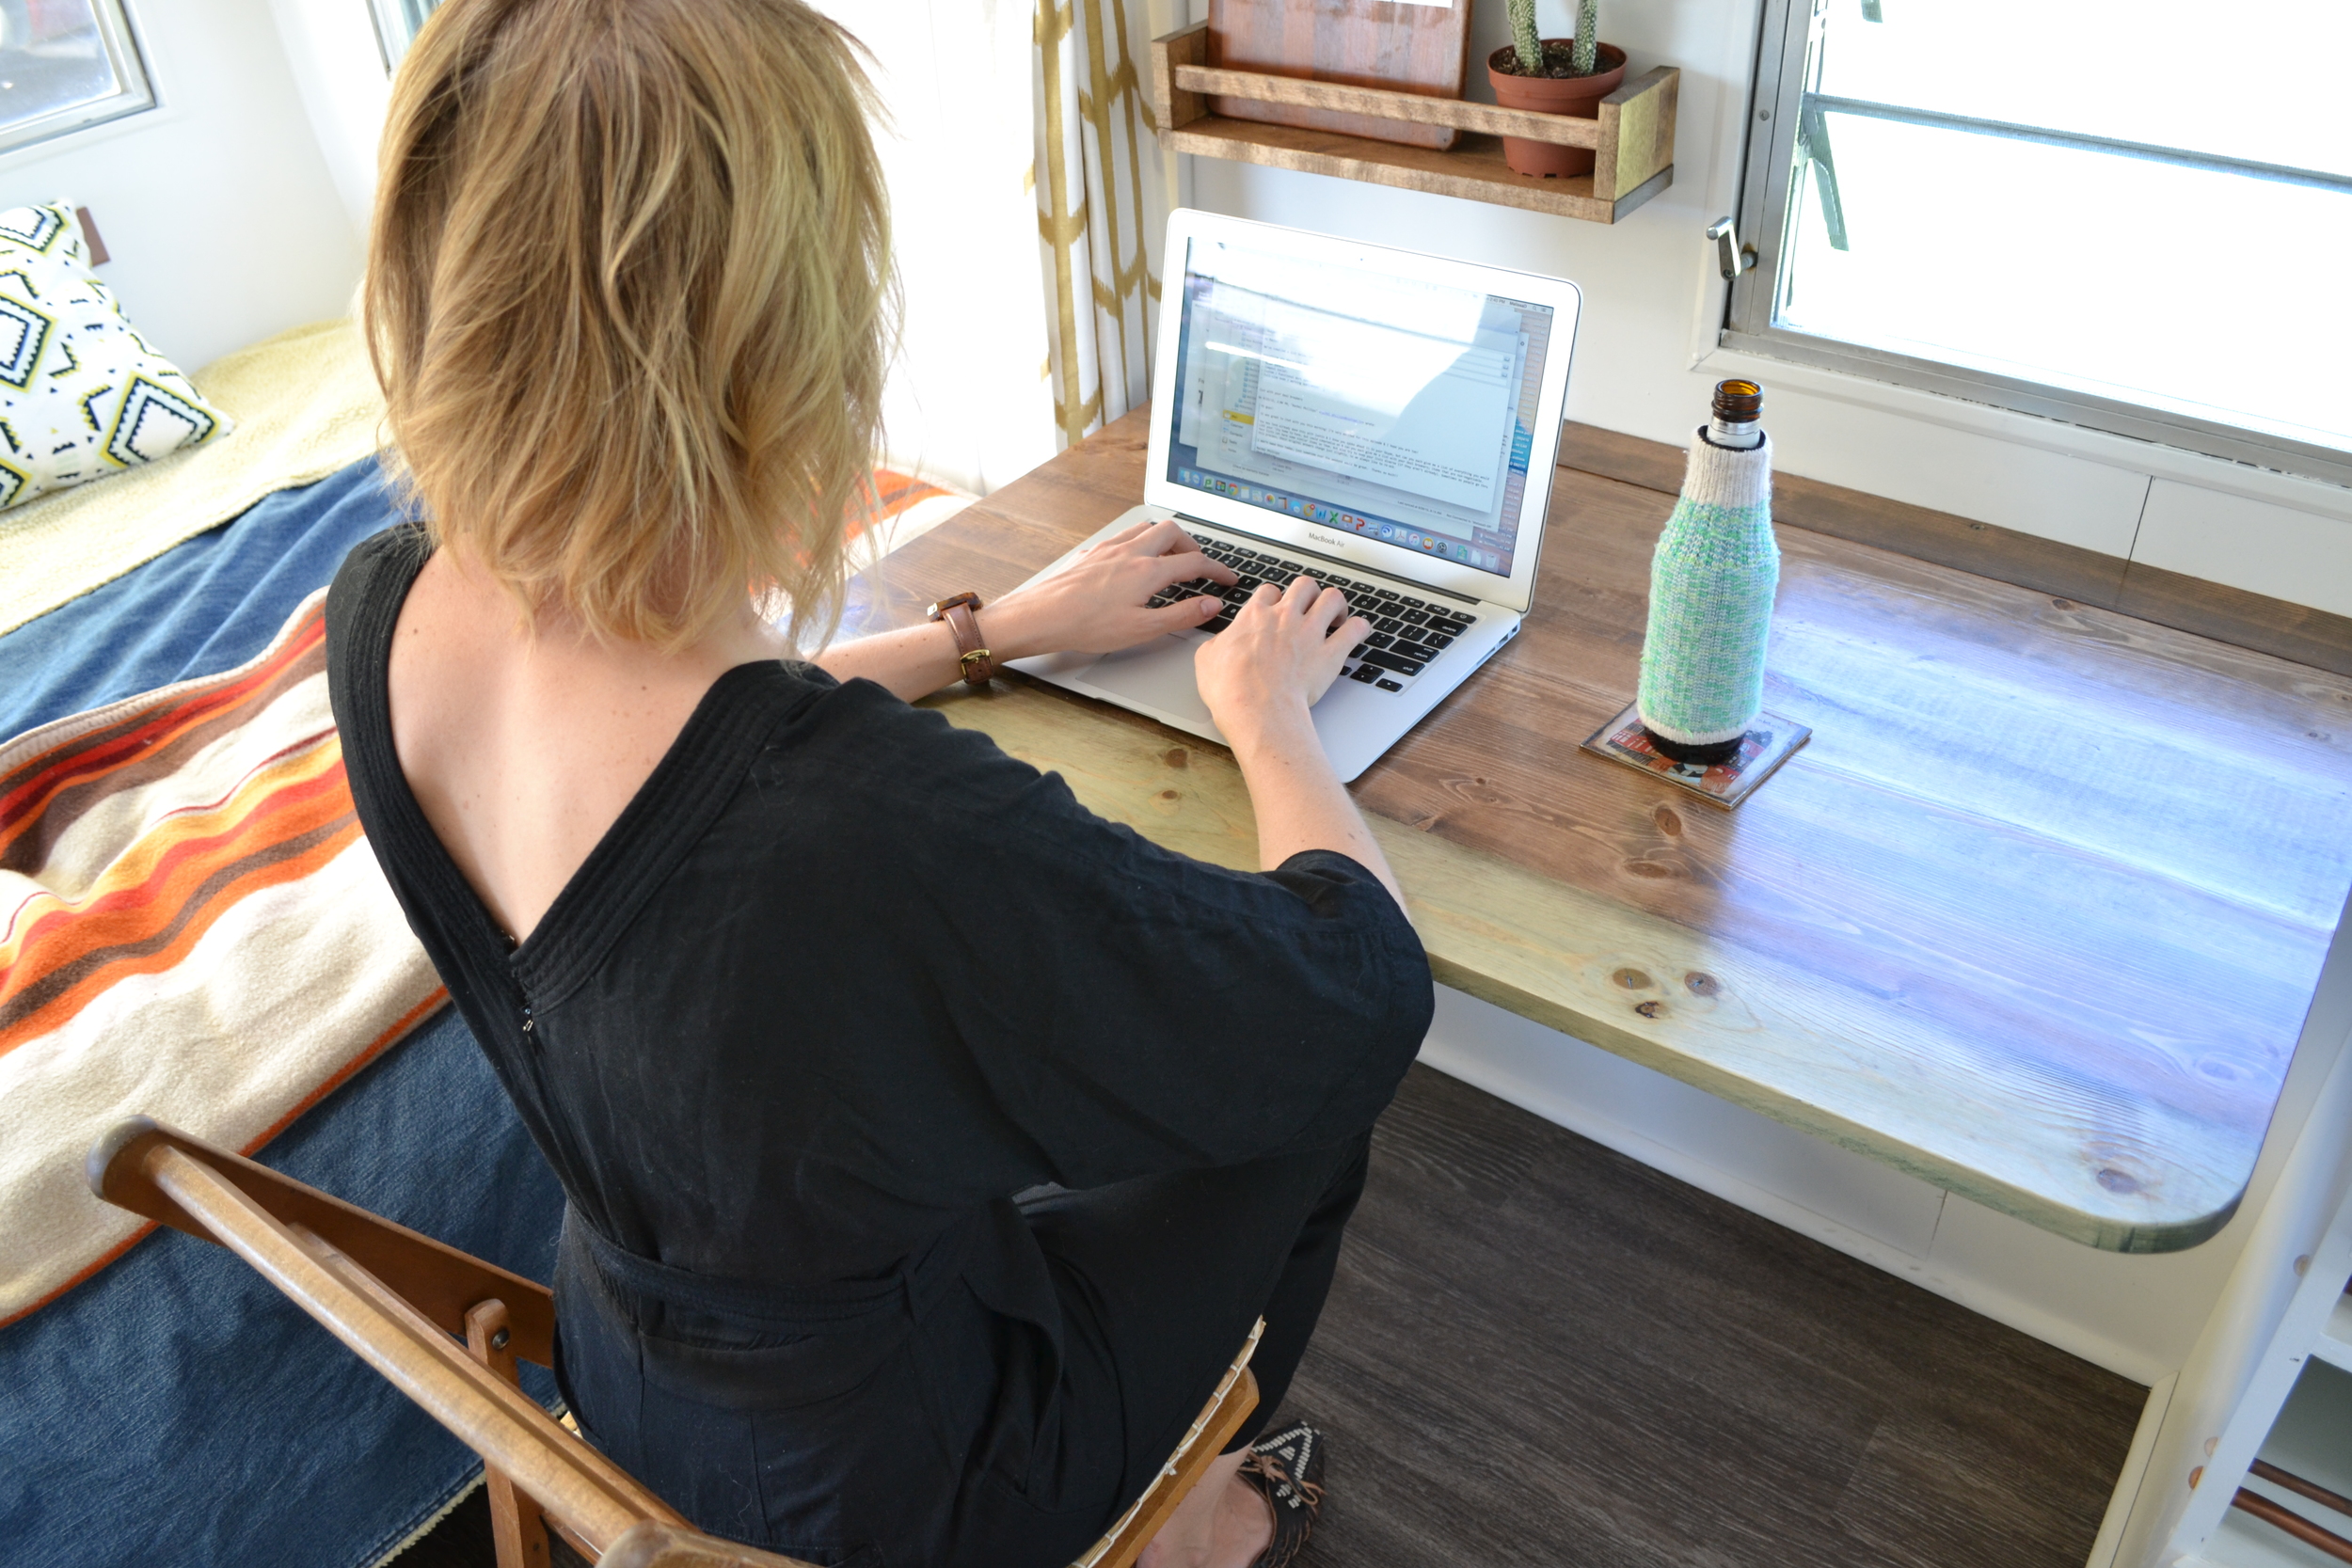
Mel using the folding desk for the first time. And sitting in Uncle Bob's chair!